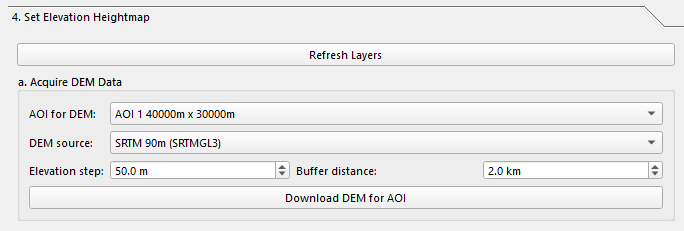
4. Set Elevation Heightmap
The Elevation panel handles three related tasks:
- Downloading or loading a DEM raster
- Styling the DEM
- Generating a hex-based elevation layer from a DEM and a hex grid
The tab label in the current UI is 4. Set Elevation Heightmap.
Panel layout
The panel contains:
- Refresh Layers
- a. Acquire DEM Data
- b. Set DEM Style
- c. Hex Elevation Layer
a. Acquire DEM Data
What is a DEM?
A Digital Elevation Model (DEM) is a raster dataset where each pixel's value represents elevation above sea level. DEMs are used to analyze terrain, create hillshades, and generate elevation-based styles.
Important
This section requires an OpenTopography API key to download DEMs. You can enter a key in the Advanced Settings of the Setup panel. The plugin will still attempt to download without a key, but it may be subject to stricter rate limits or dataset restrictions.
Use this section to download a DEM for a selected AOI.
| Control | What it does |
|---|---|
| AOI for DEM | AOI used to define the DEM request extent. |
| DEM source | Preferred starting dataset for the OpenTopography request. |
| Elevation step | Elevation band step, in meters. This also drives style ranges. |
| Buffer distance | Extra margin added around the AOI before downloading. Default is 2.0 km. |
| Download DEM for AOI | Downloads, loads, and styles the DEM. |
DEM source options
The current code exposes these presets:
| UI label | Key |
|---|---|
| SRTM 90m (SRTMGL3) | SRTMGL3 |
| SRTM 30m (SRTMGL1) | SRTMGL1 |
| Copernicus GLO-30 (COP30) | COP30 |
| Copernicus GLO-90 (COP90) | COP90 |
| ALOS World 3D 30m (AW3D30) | AW3D30 |
| ASTER GDEM v3 | ASTER |
What the DEM download does
When you click Download DEM for AOI, the plugin:
- Computes the AOI extent in WGS84.
- Expands the request extent by the configured buffer distance.
- Tries the selected OpenTopography dataset first.
- Falls back to other supported datasets if the preferred source fails or the AOI exceeds that dataset's area limit.
- Saves the downloaded raster under
Layers/Elevation/. - Attempts to warp the raster into the current project/canvas CRS.
- Loads the DEM into
Elevation > DEM. - Applies the best matching elevation style automatically when possible.
This means the selected DEM source is a preferred starting point, not a hard guarantee. The code may switch to a fallback dataset.
Output filenames
Downloaded files are saved under Layers/Elevation/ using filenames like:
<AOI>_<dataset>.tif
<AOI>_<dataset>_proj.tif
If reprojection succeeds, the _proj.tif file is typically the raster loaded
into QGIS.
Elevation step
The Elevation step value is more important than the old docs implied:
- It is used when choosing a matching DEM QML style.
- It is written back into the active config JSON when possible.
- It is used to tune raster band ranges and hex elevation styling.
- Changing it can immediately restyle the current DEM and existing hex elevation layers.
b. Set DEM Style

Use this section if you already have a DEM file or want to re-style an existing DEM.
| Control | What it does |
|---|---|
| DEM file | Path to a raster such as .tif, .tiff, .img, or .vrt. |
| Browse... | Select a DEM file from disk. |
| Style | Chooses from QML files in the configured styles/elevation/ directory. |
| Apply Style to DEM | Applies automatic or selected styling to the DEM layer. |
Styling behavior
The code first tries to auto-select the best elevation style based on:
- The DEM's minimum elevation
- The current Elevation step
- Matching QML filenames in
styles/elevation/
If no automatic match is found, it falls back to the currently selected style in the combo box.
If the DEM is not already loaded, applying style also loads it into
Elevation > DEM.
c. Hex Elevation Layer
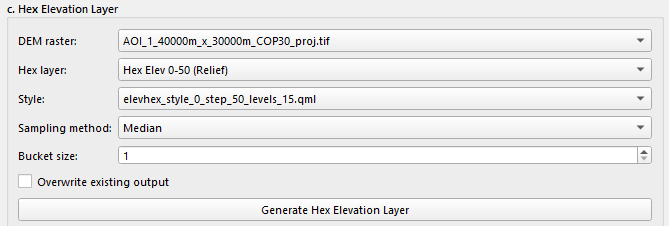
This section samples a DEM into a hex polygon layer and writes a new shapefile under the Elevation outputs.
| Control | What it does |
|---|---|
| DEM raster | Source raster layer to sample from. |
| Hex layer | Hex polygon layer, typically the generated Hex Tiles layer. |
| Style | Hex elevation QML style from styles/elevation_hex/. |
| Sampling method | Aggregation method used per hex. |
| Bucket size | Bucketing applied to sampled values before styling/output. |
| Overwrite existing output | Replaces an existing output when possible. |
| Generate Hex Elevation Layer | Writes and loads the final vector layer. |
Sampling methods
The current UI supports:
| Method label | Key |
|---|---|
| Mean (average) | mean |
| Median | median |
| Minimum | min |
| Maximum | max |
Output location
Hex elevation outputs are written under:
Layers/Elevation/HexPalette/
The current path builder creates a subfolder per source hex layer and sampling method, then writes a shapefile named:
<safe_name>_hex_elevation.shp
If overwrite is enabled but the previous shapefile is still locked, the code may write a timestamped variant instead of failing.
Loaded layer name
The resulting layer is loaded into:
Elevation > Hex Elevation
Its layer name follows this pattern:
<hex layer name> - Hex Elevation (<Method>)
For example, a median run becomes (... Median).
Output attributes
The hex elevation shapefile stores these fields, with aliases restored in QGIS when needed:
| Field | Description |
|---|---|
elev_value |
Sampled elevation value for the hex |
elev_bucket |
Bucketed elevation value used for graduated styling |
dem_source |
DEM source file/tag |
bucket_method |
Sampling method used |
generated_at |
UTC timestamp for the generation run |
The layer also stores custom metadata such as bucket size and generated time as QGIS custom properties.
Styling the hex elevation layer
When a hex elevation layer is generated, the code styles it in this order:
- Copy the DEM layer's current style if possible.
- Otherwise use the selected hex elevation QML style.
- Otherwise fall back to
elevation_hex.qml. - Rebuild graduated ranges using the current elevation base and step.
The selected DEM style can also influence the preferred hex style automatically.
Notes
- Generate Hex Elevation Layer is enabled only when both a DEM raster and a hex layer are selected.
- The DEM and hex layer selectors are populated from currently loaded project layers, so Refresh Layers is useful after imports or grid generation.
- The bucket size is separate from the elevation step. They can match, but they are not the same control.
- Existing hex elevation layers can be re-styled automatically when the elevation step changes.
Next: OSM Import