1. Setup
The Setup panel establishes the project folder, optional advanced settings, and the initial map view/CRS for the rest of the workflow.
Panel layout
Setup is split into three parts:
- a. Orient the Ground
- b. Project Settings
- Advanced Settings (collapsed by default)
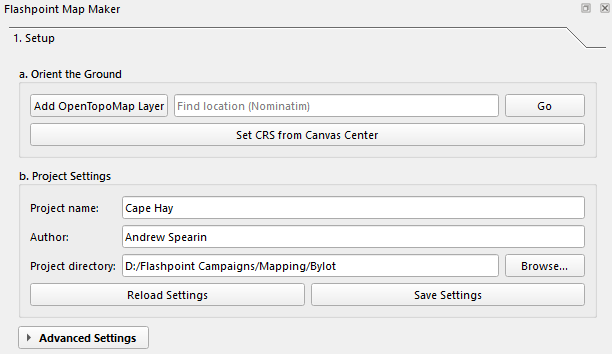
a. Orient the Ground
This section helps you move the map canvas to the correct location before you start drawing AOIs.
| Control | What it does |
|---|---|
| Add OpenTopoMap Layer | Adds the OpenTopoMap XYZ basemap so you have visual terrain/context while working. |
| Find location (Nominatim) + Go | Searches OpenStreetMap Nominatim for a place name and centers the canvas on the best match. |
| Set CRS from Canvas Center | Uses the current canvas center as the project anchor, then sets the project CRS to the matching UTM zone. This is the current one-click CRS setup action in the UI. |
b. Project Settings
| Field | What to enter |
|---|---|
| Project name | A short map/project name. |
| Author | Your name or team name. |
| Project directory | The working folder for this map. Flashpoint Map Maker creates and uses Layers/ and Export/ under this directory. |
Below these fields are two buttons:
| Button | What it does |
|---|---|
| Reload Settings | Reloads saved Flashpoint Map Maker project settings from hexmosaic.project.json if that file exists beside the current QGIS project file. |
| Save Settings | Saves the current settings to QGIS settings and also writes hexmosaic.project.json beside the current QGIS project file when possible. |
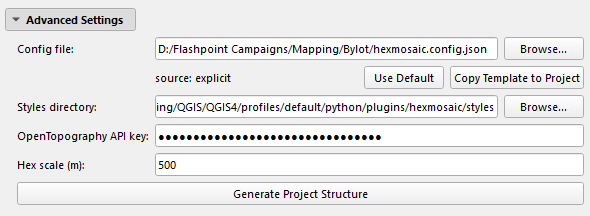
Advanced Settings
| Field / Button | What it does |
|---|---|
| Config file | Read-only path showing the active config JSON. |
| Browse... | Select a specific config file and save that choice. |
| Use Default | Revert to the built-in default config. |
| Copy Template to Project | Copies the template config into the project so you can customize it locally. |
| Styles directory | Folder containing the plugin's QML styles. Leave this alone unless you maintain custom styles. |
| OpenTopography API key | Optional API key used for DEM download steps later in the workflow. |
| Hex scale (m) | Base hex size in meters. Default is 500. AOI sizing and grid generation use this value. |
| Generate Project Structure | Creates the standard output folders, including Layers/, Export/, and Layers/Base/Base_Grid/, and ensures the project layer groups exist. |
Notes on files and folders
- AOI layers are saved under
Layers/. - Grid layers and segmentation outputs are created under
Layers/Base/Base_Grid/. - Export outputs go under
Export/. - Saved UI state is stored in
hexmosaic.project.jsonbeside the QGIS project file, not inside the project directory field unless your QGIS project is saved there.
Recommended workflow
- click Add OpenTopoMap Layer for visual reference.
- Use Find location (Nominatim) or pan the canvas manually to your area of interest.
- Click Set CRS from Canvas Center once the canvas is centered on the map area you want.
- Set Project name, Author, and Project directory.
- Click Save Settings.
- Expand Advanced Settings only if you need to change the config, styles, API key, or hex scale.
- Continue to Map Area.