2. Map Area
The Map Area panel is where you define the geographic extent of your game map. You can create a single AOI, generate AOIs from points of interest, create a bounds AOI for an AOI group, and segment an AOI into smaller tiles.
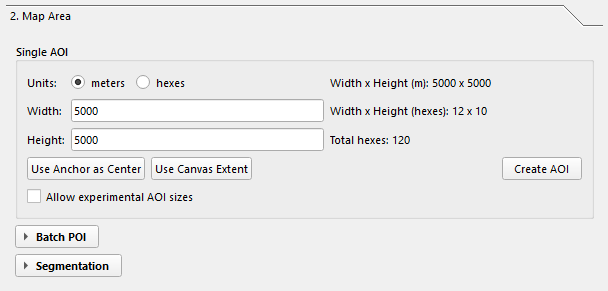
Creating a single AOI
Set the size
Choose meters or hexes, then enter width and height. The panel updates live to show:
- Width x Height in meters
- Width x Height in hexes
- Total hexes
| Unit | Default |
|---|---|
| Meters | 5000 x 5000 |
| Hexes | 10 x 10 |
If either dimension exceeds 99 hexes, Create AOI is disabled unless
Allow experimental AOI sizes is enabled.
Position the AOI
| Button | How it works |
|---|---|
| Use Canvas Extent | Reads the current QGIS map canvas extent and fills the width/height fields from it. |
| Use Anchor as Center | Re-centers the canvas on the saved Project Anchor. After that, Create AOI uses the canvas center. |
Create it
Click Create AOI. The plugin creates a rectangular AOI centered on the
current map canvas center, saves it as a shapefile under Layers/, and adds it
to the Base group. The loaded layer name follows this pattern:
AOI <index> <width>m x <height>m
Large AOIs: Experimental AOIs larger than
99 x 99hexes are allowed, but the code warns that they may slow editing, segmentation, export, and QGIS rendering.
Creating AOIs from points of interest
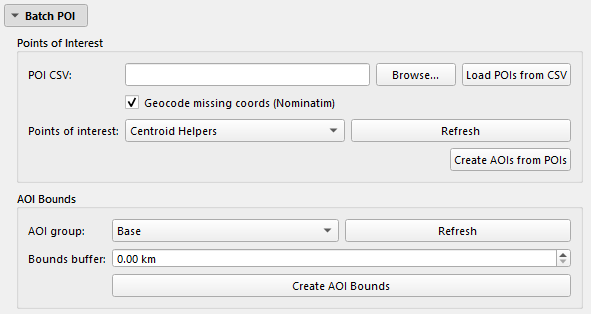
The Batch POI section is collapsed by default. Expand it to work with CSV imports and grouped AOIs.
POI CSV import
- Choose a CSV file in POI CSV.
- Leave Geocode missing coords (Nominatim) enabled if rows without
coordinates should be looked up from
locationandcountry. - Click Load POIs from CSV.
- Select the imported layer under Points of interest.
- Click Create AOIs from POIs.
The import code currently recognizes these CSV headers:
| Header | Purpose |
|---|---|
location |
Main place name used for labels and geocoding. |
country |
Optional country/region text appended to the geocoding query. |
lat lon |
Coordinate pair, interpreted as latitude then longitude. |
lonlat |
Coordinate pair, interpreted as longitude then latitude. |
width_km |
Optional per-row AOI width override in kilometers. |
height_km |
Optional per-row AOI height override in kilometers. |
label |
Optional fallback label when location is empty. |
Imported POI shapefiles are saved to Layers/POI/.
AOIs from POIs
When you click Create AOIs from POIs:
- The plugin uses selected POI features first; if none are selected, it uses all POI features in the layer.
- AOIs are created in a nested group under
Base > AOI Groups. width_kmandheight_kmoverride the panel size for that individual POI if those fields are present and greater than zero.- Oversize AOIs are skipped unless Allow experimental AOI sizes is enabled.
AOI bounds
Use AOI Bounds to create one bounding AOI around an existing AOI group.
- Select an AOI group.
- Set Bounds buffer if you want extra padding.
- Click Create AOI Bounds.
The plugin combines the extents of polygon AOIs in the selected group, applies
the optional buffer, and saves the result as another AOI shapefile under
Layers/.
Segmenting an AOI into tiles
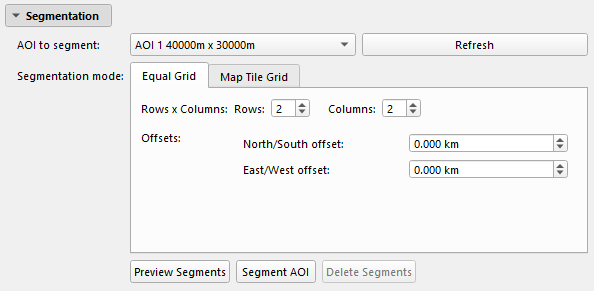
The Segmentation section is also collapsed by default.
- Select AOI to segment.
- Choose Equal Grid or Map Tile Grid.
- Set the segmentation parameters.
- Click Preview Segments to generate a temporary preview layer.
- Click Segment AOI to save the segments.
- Use Delete Segments to remove saved segments for that AOI.
Saved segment outputs go under:
Layers/Base/Base_Grid/<AOI>/Segments/
Equal Grid mode
| Setting | Range | Default |
|---|---|---|
| Rows | 1-25 | 2 |
| Columns | 1-25 | 2 |
| North/South offset | -500 to +500 km | 0 |
| East/West offset | -500 to +500 km | 0 |
Map Tile Grid mode
| Setting | Options |
|---|---|
| Tile scale | 1:25k (5 km), 1:50k (10 km), 1:100k (20 km), 1:250k (50 km) |
| Alignment | Match AOI extent (legacy), Snap to MGRS minute grid (15'), Snap to MGRS degree grid (1 deg) |
| Offsets | North/South and East/West, in kilometres or arc-minutes |
Next: Generate Grid